What happened to Bill Reynolds?
In Part 1, I provided details about Bill Reynolds’ heroic work rescuing civilians affected by the fall of Singapore aboard the Kofuku Maru, which was renamed as the Krait and played a pivotal role in the success of Operation Jaywick.
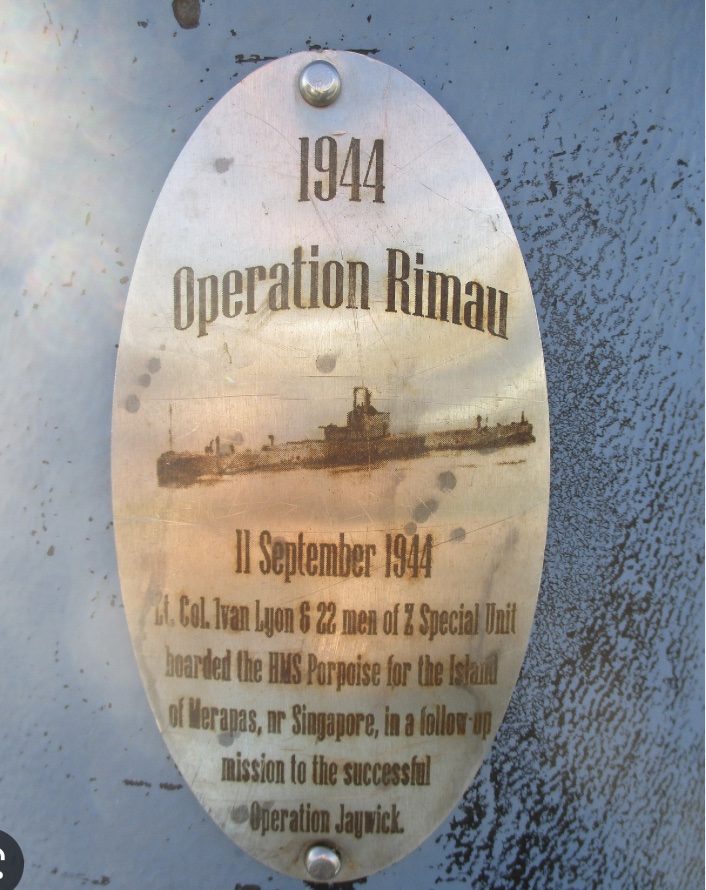
While Reynolds wasn’t part of Jaywick, he delivered the Krait to Australia and was going to captain the vessel on the daring raid to Singapore Harbour. But during a hiatus when it had mechanical problems, Reynolds went to Melbourne to work for the clandestine civilian Bureau of Economic Warfare. He left Australia to work for the Americans as an intelligence officer. Fluent in Malay and with a good grasp of Chinese, he was landed by the American submarine USS Tuna in the Straits of Macassar to pick up information from Chinese secret agents. On the night of 13 November 1943, he left in a small boat for Lautt Island, near Borneo. Unfortunately, only a few days later, local villagers revealed his presence to the Japanese and he was captured on 18 November.
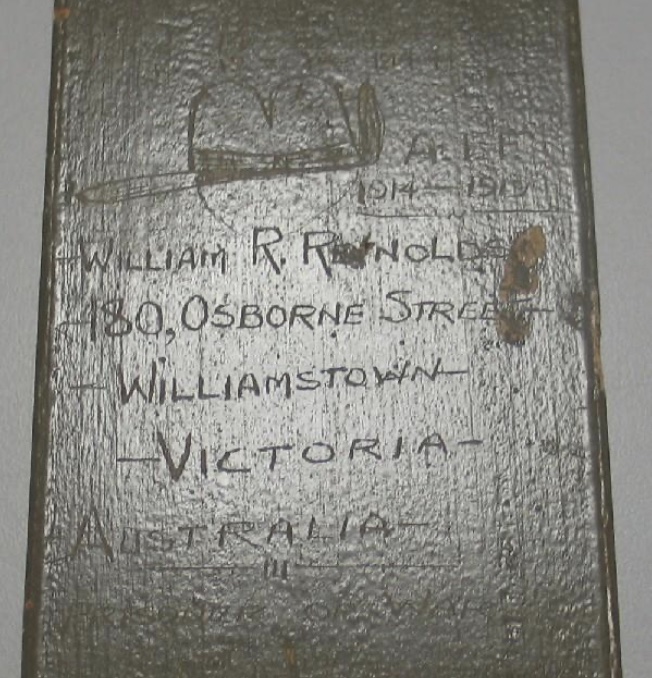
He was held at Kota Bahru in northeastern Malaya for eight days and then moved to Balikpapan, a port city on Borneo. On 10 February 1944, he was moved to Surabaya in Java, and on the morning of 8 August 1944, he was among several prisoners executed by the Japanese, either by decapitation or firing squad. Reynold’s fate was the latter. He was buried in an unmarked grave.
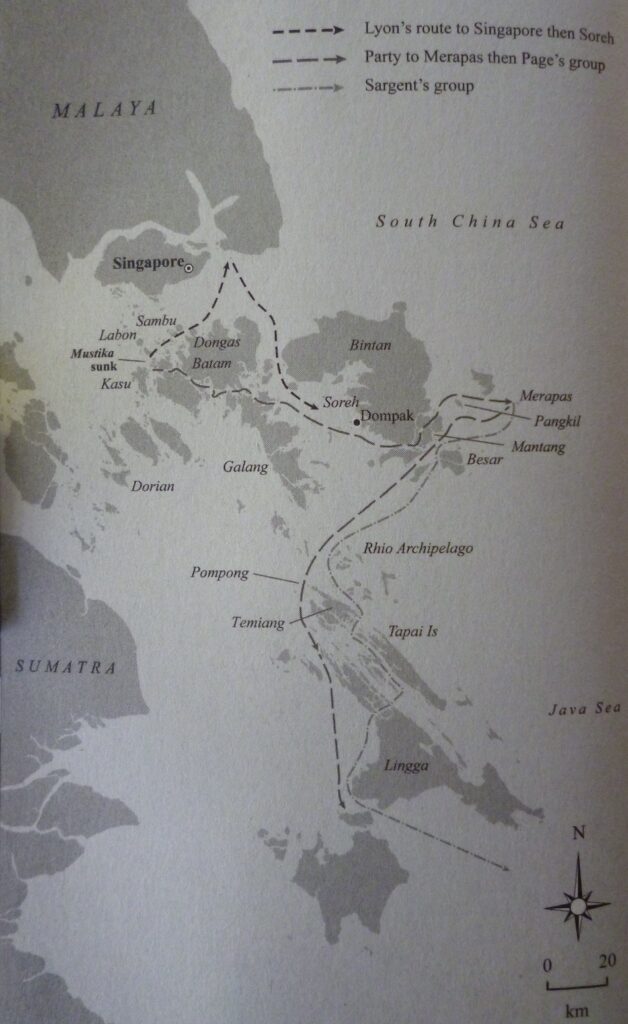
Scratchings on his cell door by Reynolds at Balikpapan.
We know about Reynolds’ time in captivity because while at Balikpapan, he scratched messages about himself on his cell door. Members of the 7th Division AIF searched the prison building in August 1945. They discovered Reynolds’ messages and cut away the piece of the door as evidence, donating it to the Australian War Memorial.
The Jaywick Men who didn’t go on Operation Rimau
Ted Carse replaced Reynolds as the captain of the Krait. He trained at the Naval College at Jervis Bay, but left the Royal Australian Navy to become a teacher. However, that didn’t last long, and he was back at sea as a seaman on a British merchant ship before transferring to a Norwegian steamer, then a lugger at Thursday Island and pearling out of Darwin.
At the outbreak of World War II, he tried to rejoin the Royal Australian Navy but was declared medically unfit. By 1942, the Royal Australian Navy changed its mind as Australia’s situation looked bleaker. He was posted to HMAS Magnetic, a land-base at Townsville. He was promoted to Lieutenant on 4 January 1943, and within days, he was approached by Lyon to replace Reynolds, interviewed in Melbourne, and became part of Jaywick.
Lieutenant Ted Carse.
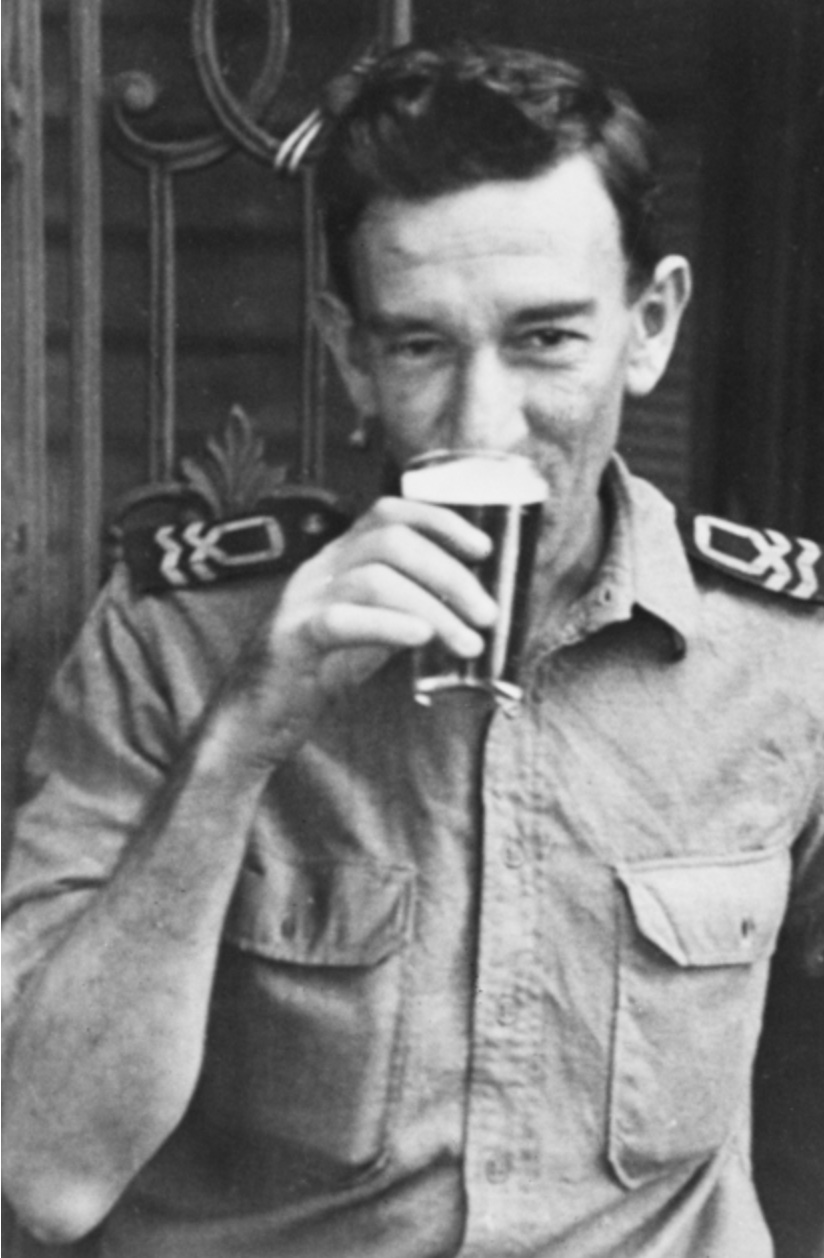
After Jaywick, he married, resuming work at HMAS Magnetic before a final posting to HMAS Kuttabul, resigning his commission at the end of the war. He was aboard the Krait in 1964 when it made its entry into Sydney Harbour to commence its role as a museum ship. On board were Horrie Young, Joe Jones and Moss Berryman. He died in 1970, aged 69.
Not much is known about Kevin “Cobber” Cain after the war. He enlisted in the Royal Australian Navy Reserve in 1940 and was discharged on 5 February 1946. He died in Queensland in 1980.
Andrew Crilly was born in Scotland in 1913, and his family moved to Queensland at the end of World War I. He enlisted in the 2nd AIF for overseas service. Stationed at Atherton as a Corporal, he joined Z Special Unit. He was discharged after the war. He married and settled in the Lockyer Valley in Queensland, working on local farms. He suffered following the war from what many believe was undiagnosed PTSD. He never spoke about the war, and his wife and children had no idea he was a part of Jaywick and a war hero. He died in 1963.
Paddy McDowell was born in Belfast, and he served in the Royal Navy, rising to Petty Officer. He married in 1926 in Brisbane. Living in Sydney, he was in the Royal Navy Reserve when World War II broke out, and was appointed Leading Stocker when he enlisted. He was awarded the Distinguished Service Medal. He passed away on 10 January 1964 in Brisbane. His ashes were delivered to the recently refurbished Krait that was about to sail from Brisbane to Sydney. His ashes were scattered at sea by his Jaywick mates Ted Carse, Horrie Young and Joe Jones. A plaque to Paddy’s memory has been placed at Queensland Garden of Remembrance.
Ron “Taffy” Morris was Lyon’s “batman” or personal servant. Born in Wales, he was a soldier in the Royal Army Medical Corps. He was in Singapore and helped Lyon rescue civilians and evacuate them by boat to safety. After Jaywick, Morris was promoted to temporary sergeant and awarded the Military Medal. He was later awarded the British Empire Medal. In the early 1980s, together with Horrie Young and Joe Jones, they appeared on an episode of This is Your Life about the Krait.
Horrie Young was born in Western Australia, enlisting in the Royal Australian Navy in 1939. In 1942, he married in Sydney. After Jaywick, he transferred to the Services Reconnaissance Department training camp at Fraser Island and then to general naval duty in 1944. He left the Royal Australian Navy in 1946. He retired to Hervey Bay in the 1960s, started the local radio club and brought with him his souvenir piece of the Krait, which is now on permanent display at the Hervey Bay Historical Village and Museum with a replica model of the Krait. He was onboard the Krait when she was sailed to her new home in Sydney in 1964. He was appointed trustee for the Krait when it was officially handed over to the Australian War Memorial. He died at his home at Woy Woy in July 2011, aged 90.
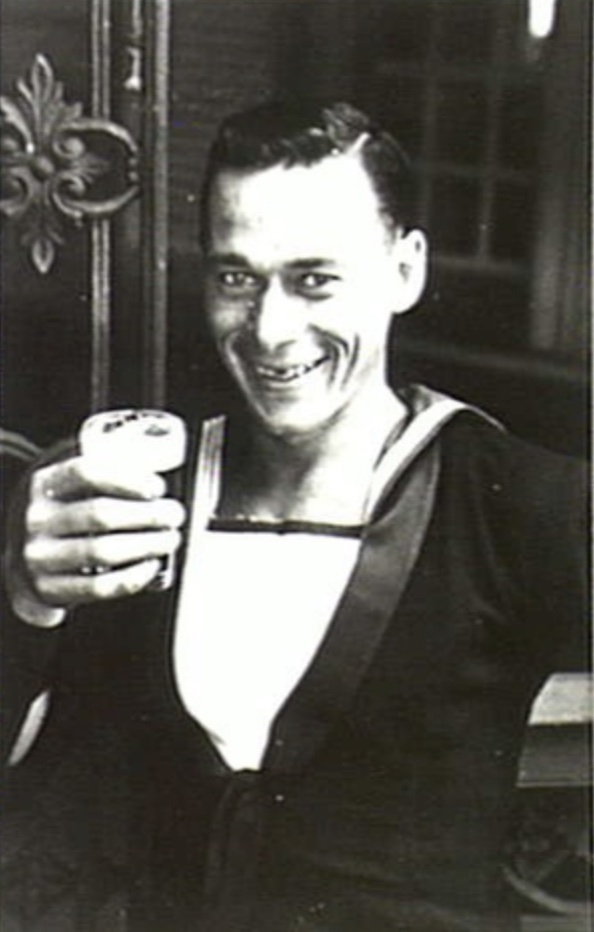
Arthur “Joe” Jones was born in Western Australia and he enlisted in the Royal Australian Navy in December 1941. He initially served aboard the armed merchant cruiser, HMAS Manoora. He was discharged in 1946, married in 1947 in Western Australia and died there in 2013.
Able Seaman Arthur “Joe” Jones. AWM 045409.
Moss Berryman was born in South Australia and enlisted in the Royal Australian Navy in 1942. Moss recalled in later life that, in December 1943, when Major Lyons asked him whether he would care to return to Singapore as part of a repeat operation, he carefully considered the proposal for two seconds before declining. He spent the remainder of the war serving aboard the destroyer, HMAS Vendetta, patrolling off New Guinea and was de-mobbed on 21st February 1946. After the war, Moss returned to his old job with stockbroking firm, S C Ward & Co., where he remained until retirement 46 years later. In 1993, at the 50th anniversary of Jaywick, Moss met Lyon’s son Colin at Lyon’s grave in Kranji War Cemetery. He died in 2020, aged 97. He was the last surviving member of Operation Jaywick and Z Special Unit.
The fate of Lyons and his men
I finished Part 2 with five men on Soreh Island on 15 October 1944, waiting for the arrival of Japanese troops after a local Malay betrayed them by alerting the Japanese. They were Lyon, Davidson, Ross, Stewart and Campbell. They had between them five Sten guns with 400 rounds of ammunition, five .38 revolvers with 24 rounds each and 12 hand grenades. Unfortunately, Soreh Island offered few advantages for any defensive positions. It was flat with little undergrowth, providing excellent visibility from shore to shore for a chasing enemy.
Campbell and Stewart occupied a shallow depression on the western side of the island, and Davidson a small trench nearby, which had stones packed on its rim. Lyon and Ross climbed one of the few ru trees scattered among the palms overlooking the landing site. About 40-45 Malay volunteers under Japanese command arrived at the island about 3 pm on 16 October. While the bulk of the party remained at the landing area, a small contingent walked towards the ambush site. The Rimaus opened fire and inflicted heavy casualties. The remaining invaders responded, and a heavy gunfire battle ensued for several hours.
Davidson and Campbell had serious wounds to their upper arms and chests. It was decided they would paddle to the safety of Tapai Island while Lyon, Ross and Stewart remain to fight the Japanese. They launched their folboat without being seen and headed south, hoping to meet with Huston and Warne, who were ordered by Davidson the day before to head for Tapai Island towing the rubber raft.
Somehow, Davidson and Campbell made it to Tapai Island, only to discover that Huston and Warne had already gone in their folboat after hearing the firefight the night before. Before they left, they sank the rubber supply boat. Alone with only one pistol and no ammunition, and one hand grenade, they knew their chances of escape or fighting were limited. In their condition, they didn’t want to fall into Japanese hands and be brutally tortured.
Sadly, the bodies of Davidson and Campbell were found sitting upright, side by side, the next day. They committed suicide by taking their potassium cyanide capsule.
When darkness fell without a moon, the tide turned against the three Rimau men still alive on Soreh Island. Despite that disadvantage, the Rimau commandos tore into the cautiously advancing Japanese with deadly fire and exploding grenades. The explosions allowed Lyon and Ross to effectively use their silent Sten guns with brutal effect on the enemy. At around 10 pm, another Japanese barge arrived with about 50 men. They immediately opened fire, and the battle continued late into the night. The Japanese eventually realised where the deadly fire was coming from above them in the trees. A grenade lobbed into the treetops blew Lyon and Ross from their position. At dawn, the Japanese advanced to find Lyon and Ross. Both died instantly from the grenade blast during the night. It was the same day that HMS Tantalus left Fremantle to rescue them.
Stewart managed to slip away and find a hiding place on the island. The Japanese found his folboat and took it with them when they left. While he had food and water, he was stranded on the small island and was the first Rimau commando to be captured.
The men waiting for the submarine
The other 15 men, under the command of Page, had left for Merapas Island after the sinking of the Mustika and arrived safely. It was here that Carey, Cameron and Riggs had been guarding the supplies. Huston and Warne arrived soon after, around 20 October, from Talai Island. The island was uninhabited, and they planned to wait for the planned return of the submarine on 7 November to pick them up.
However, early on the morning of 4 November, a contingent of Japanese military personnel on two barges arrived at Mapor Island to investigate the downing of a Japanese aircraft. Finding nothing, they went to nearby Merapas Island, landing on the western side and walked through the coconut plantation.
The Rimau party were holed up in two locations on high ground, nervously watching the advance. One of their Sten guns discharged, killing the Japanese commander. All the men, except for Riggs and Cameron, managed to get to their folboats to leave Merapas. Those two didn’t stand a chance and couldn’t prevent an aggressive advance. Cameron was wounded and as the Japanese stormed over his position, he was shot dead through the back of the head, the bullet passing out of his mouth and knocking out some teeth. Riggs scrambled away, drawing Japanese forces to the southern end of the island, allowing his mates a chance to escape the island. He was fatally shot three times in the chest.
Page believed that splitting the group into smaller parties was their best chance of escape. They grouped themselves into three boat parties – Page, Falls, Gooley and Fletcher in one party and Ingleton, Hardy, Marsh, Carey and Warren in another. They managed to paddle to the much bigger Mapor Island, about ten kilometres north-west of Merapas Island, to await the submarine pick up.
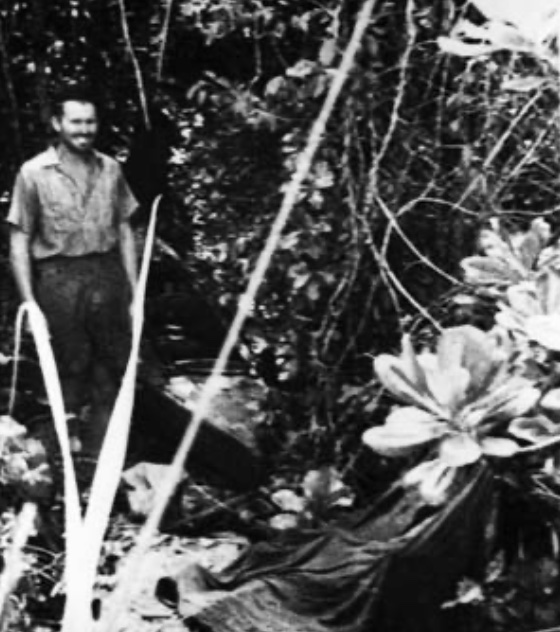
The third group of Reymond, Sargent, Craft, Willersdorf, Pace and Warne lost contact and spent the night on Merapas under cover. They stole two Malay canoes called koleks the next morning that some Malays had moored offshore to tend to a coconut plantation, and headed south out to sea in their craft, blending in with the native vessels.
Map showing the escape route.
Their destination was Pompong Island, familiar to Page as it was where the Krait spent a night on Operation Jaywick. It was a contingency previously discussed, and it was here that the submarine would pick them after collecting Page’s group of men from Merapas Island.
Page maintained a two-man picket on Merapas Island from dusk to dawn each night to wait for the submarine. HMS Tantalus, commanded by Hugh Mackenzie, didn’t arrive on the first planned pick up night of 7 November and missed the next two nights. This was due solely to Mackenzie’s attitude. He later justified his negligence by saying he had both fuel and torpedoes and his primary aim was to sink enemy ships.
The fleeing men missed seeing the submarine on the night of 21 November because Mackenzie surfaced on the wrong side of the island, again against his orders. And Chapman and Croton, from the submarine, didn’t arrive at the main camp site until daybreak on 22 November.
While Page couldn’t believe they would be callously abandoned, once 7 December arrived without any sign of the submarine, he decided their only choice was to paddle their way out of Japanese occupied territories. Between them and the safety of Australia lay a chain of islands to Timor within 3,000 kilometres of enemy-held territory.
One of the Australian raiders hides the small, two-man canoe he and a comrade paddled to an island near Singapore Harbour.
By this time, the Japanese knew a lot about Operation Rimau after collecting from the bodies of the slain their notebooks, Davidson’s and Carey’s dairies, a sketchpad, cameras, weapons, supplies and lists of personnel. They managed to piece together the whole operation, including the secret locations of the submersible boats and supplies. The coded reports sent by the Japanese were not given a high priority, and so, when the Australians intercepted them, they also didn’t have a priority for decoding. Not that it would have helped much, as the Australian authorities had no idea of the men’s whereabouts. Mackenzie was no help either after the Tantalus arrived back in Fremantle.
Splitting into their two original groups, the men under Page left on a paddle of 185 kilometres for Pompong Island, and met up with Reymond’s group. The plan was to then move into the coastal trading routes to commandeer a junk and sail back to Australia. However, the monsoon season had arrived, which meant sea navigation was hazardous and the junks were sitting safely in ports, making their escape even more perilous. Each group communicated on walkie-talkies but had no idea the Japanese were listening in.
On 15 December, Page’s group were resting on Selajar Island, but the Japanese were closing in. A Japanese patrol interviewed the locals with threats and bribes. They found out about the four “white” men. Page and his men were attacked, with Falls shot in the hip and captured. The other three escaped and hid on the island.
Able Seaman Walter “Poppa” Falls. AWM 045408.
Falls was beaten the day after his capture and transferred to Singkap Island a few days later. Page, exhausted, wet and hungry, was caught in a hut and surrendered, the same day, 19 December, his beautiful new young wife received a telegram saying he was missing. Gooley and Fletcher were caught the following day.
Further north, Ingleton’s group, between the islands of Pompong and Buaja, were involved in a gunfight. Huston and Marsh’s folboat paddled into a trap. Their kayak was holed by gunfire and sank. Marsh managed to swim to Tjempa Island and hid with Carey and Warren. Huston was caught in a fierce rip, swept away and drowned on 16 December. He is the only member of Operation Rimau whose body was not recovered.
On Gentung Island, not far from Bauja Island, Ingleton and Hardy were involved in a brief gun fight. Hardy was wounded in the shoulder, and they were forced to surrender on 18 December.
Marsh, Carey and Warren managed to stay under cover until 27 December on Tjempa Island, where a search party eventually discovered them. Marsh was singled out for beatings and torture, suffering a bayonet injury to the upper chest.
Meanwhile, the remaining six men on the run were sailing along the south-western coast of Lingga Island, having only stopped at Pompong Island briefly. Reymond, Sargent and Craft abandoned their kolek after they managed to find a junk and were taken aboard. Unfortunately, that night, as they slept, the Chinese crew had second thoughts and attacked the men. Reymond received a massive blow to the head, and both he and young Craft were thrown overboard. Their bodies washed ashore on Maja Island. Sargent leapt into the sea, spending 24 hours floating and another day clinging to a fish trap near Cape Satai until local fishermen handed him into the Japanese Naval Base on 22 December. He was interrogated on Boxing Day.
Nine of the captured men were taken to Tanjung Pagar in Singapore to join Stewart, who had already been taken there in October and relentlessly tortured, refusing to talk. Marsh was carried on a stretcher to the Kempeitai headquarters, lingered for two more days with an untreated malarial fever, and died as a prisoner of war. That left Page and Falls as the remaining two men from the Jaywick Operation still alive. The other man alive, Lieutenant Albert “Blondie” Sargent was still captive at Surabaya on Java.
The small group of Willersdorf, Pace and Warne managed to slip through the net on their stolen kolek. They sailed along the west coast of Borneo before turning south toward Timor. Warne caught a fever and, fearing he would die at sea, was left at a sheltered beach on Kadapongan Island.
Willersdorf and Pace managed to navigate across the Banda Straits, stopping along the way the food and water. After 3,000 kilometres, they reached Romang Island on 17 January 1945, only 600 kilometres from Darwin across the Timor Sea. However, a local chief alerted authorities, and they were captured a few days later and taken to the Japanese headquarters at Dili. They were tortured without mercy and then thrown into a cell and left to die of their wounds. Willersdorf died in March and Pace in June.
Miraculously, Warne recovered from his fevered delirium, commandeered a small boat and managed to hide whenever the Japanese came close. They knew about him, and Warne evaded capture until March. He was the last Rimau to be captured and was taken to Surabaya on Java and tortured. The Japanese were in a rage that yet another Rimau operative had been captured, and the brutality metered out to Warne knew no bounds. He died in April, either as a result of untreated wounds in prison or left to die, like other prisoners, at the naval hospital after being used as a guinea pig in an anti-tetanus experiment. Sargent was flown to Singapore to join the other Rimau captives in March 1945. All remaining ten prisoners were transferred to Outram Road jail.
The beheading
The remaining Rimau commandos, along with other prisoners, were routinely beaten daily with a sword scabbard or with fists and feet. They were used as punching bags by guards to refine their martial art of jujitsu. The place was a haven for disease and filth, with many men suffering from beriberi, scabies, malaria, dysentery and other diseases. Food was a measly five hundred grams of rice per day. The Japanese were incensed when they found out some of the Rimaus had been involved in Operation Jaywick.
Bob Page was only 24 and newly married. “Blondie” Sargent had already served in North Africa and Syria in the militia before going to New Guinea for commando work. He was just 25. Reginald “Otto” Ingleton was a Londoner who had joined the Royal Marines and volunteered to go to Australia to find action in Z Special Unit. He was 26. Canberran Carey was 31. He was a plantation owner in New Guinea before the war and joined the Z Special Unit at the first opportunity. Thirty-two-year-old Alf Warren was a mechanic on tanks before transferring to Z Special Unit when they needed a good mechanic. The oldest was Clair Stewart, a signaller from Western Australia. He was 35. Dubliner Roland Fletcher was 29. He came to Australia with his parents and went straight from training camp to the Z Special Unit, as did Gooley, the 27-year-old. “Poppa” Falls was Scottish and was living in Casino, New South Wales, when the war broke out. He was 27. The baby of the group was Hardy at only 23.
While they were to face a trial, their prospects weren’t favourable. After all, they were held captive by a nation that refused to sign the Geneva Agreement; butchered thousands of civilians in the rape of Nanking; tortured and killed men on the Burma Railway; and orchestrated the Bataan Death March, which saw 10,000 American and Filipino troops die. The captors had already been classed as war criminals for having acted “in violation of international law and the conventions of warfare”.
As the collapse of the Japanese war effort gradually became a reality, the ten Rimau prisoners were put on trial on 3 July, where they were all charged with “perfidy and espionage”, found guilty and sentenced to execution. This was part of the Japanese belief of bushido. The remaining Rimau men were not to return and instead were to die honourably as war heroes. One by one, they had to dig their own graves to watch and wait for their execution. With a calm dignity, they farewelled each other.
They were publicly beheaded on 7 July 1945, just 39 days before the Japanese surrender and the end of the war. A member of the Royal Army Medical Corps examined the bodies and reported they were hacked to death, not a clean bushido-type operation after all. Their bodies were dumped in three unmarked graves.
After the war, their bodies were exhumed and, together with the bodies of those who died on the islands near Singapore, including Ivan Lyon, were buried in the Kranji war cemetery on Singapore Island.
A terrible betrayal
Unfortunately, Operation Rimau was a tragic sequel to Jaywick.
A British submarine sent to collect them arrived two weeks late and failed to make contact. While the Operation Rimau men desperately tried to stay alive in the maze of islands from a relentless Japanese pursuit, they were betrayed by a callous submarine commander and a weak operative they had relied upon to return home safely.
Commander of the submarine, Hugh Mackenzie, went on to become a Vice Admiral of the Royal Navy instead of bearing responsibility for the fate of brave men who spent their last breathing days subject to the barbarism of the Japanese officers and army.
Walter Chapman committed suicide in 1964, days after being interviewed about his role in not rescuing the men waiting for the submarine to take them home.
The public never appreciated the daring and heroic attempt to dent the Japanese and was never known by the families of the men involved, as the high command in Australia did their best, for 50 years, to cover-up their failures of Operation Rimau and more importantly, to hide their shame of allowing men to be abandoned and die at the hands of the barbaric Japanese. Nothing more was heard of Operation Rimau until many years after the war, when Services Reconnaissance Department files were opened to researchers and their contents linked with information from other sources and reports of the interrogation of Japanese officers, the Kempei Tai, and local people of Singapore and the islands.
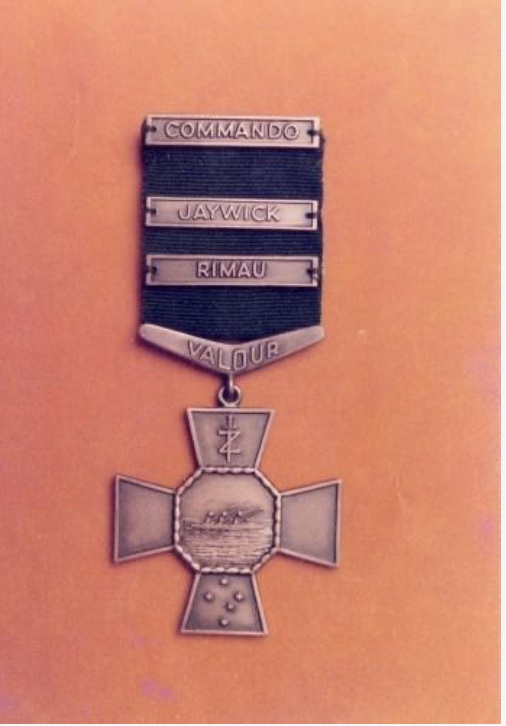
In January 1978, a medal was designed to acknowledge the efforts of the Z Special Unit members who were involved in Operations Jaywick and Rimau. It was called the Commando Cross of Valour.
The Commando Cross of Valour.
There are many books now written if you want to read about Operation Rimau. I recommend Bruce Macklin’s Kill the Tiger: The truth about Operation Rimau and Lynette Silver’s The Heroes of Rimau.
The unsung heroes, may they now never be forgotten!
Thank you Robert for this trilogy.
“Lest we forget”
Incredible bravery my Great Uncle “Clair Stewart” only Aussie alongside Lyon, Davidson, Campbell, Ross on Soreh Island and what they were up against to help the others escape is hugely understated and overshadowed by other variations what really happened and names and the fact thet RIMAU wasn’t a successful mission. He risked it all, survived got captured, specifically “Nine of the captured men were taken to Tanjung Pagar in Singapore to join Stewart who had already been taken there in October and relentlessly tortured, refusing to talk”. Only to be beheaded by the Japanese losing the war! RESPECT and RIP my great Uncle and his mates!!!
The roles of the submarine captain, Hugh Mackenzie, and the Conducting Officer, Walter Chapman, are more nuanced. Both were undoubtedly brave men. The problem lay, in my view, with the ambiguity of Mackenzie’s written orders, which gave him discretion to delay the pick-up date depending on operational requirements.
The orders should have stated categorically that the submarine must be in the prearranged position off Merapas island on the appointed night, returning at arranged short intervals on further nights for a designated period of time. The only exception would be if the submarine and its crew of 61 men had been in clear and direct danger.
Some of the Rimau men might well have been saved if the rendezvous had been made on the 7th with the two-man picket despite a small force of Japanese being on the island.